Articles by "Tricks"
Showing posts with label Tricks. Show all posts


Once again, we meet here to talk about different things about Technology today and talk about modem to the old net because there are different networks. these steps so you can join


requirements and how to do this exercise

All you have to do is have your modem with any phone line
Download (download) nokia pc suite installed on your machine Download it here


Then install your modem on your desired machine
Then shut down your modem software
1. open your nokia pc suite program
click on the "create an interne connection" section that opens will bring you the message "no device connected"

2. Click "sparner like icon" here to show you your modem that you have installed on your machine

3.click again on ICON to set up your Internet APN as you would on your phone
then press connect will connect and will show you the speed of your internet connection
until then you will have completed this task and started enjoying your internet.
10+ Best CMD Commands Used In Hacking in 2020

Why Do You Format USB Flash Drive

  • The storage devices that are widely used nowadays are typically HDDs and SSDs, which are always set up on a PC/Mac to install the operating system and store data files.
  • Meanwhile, there are many other types of prevailing devices with more flexible features for different purposes. Yes, they are removable storage devices such as USB flash drive.
  • The truth is that no matter what drive you're using, it must have a valid file system so that Windows can recognize it and put it to use.
  • What's more, it's inevitable to develop bad sectors or corruption issues on a specified flash drive after a long-time use.
  • By formatting, you can easily fix any USB flash drive, pen drive or memory stick that is write protected, virus infected, corrupted, damaged, unreadable, unrecognized by PC and Mobile.
  • So here comes the question, how to format a USB flash drive? This page mainly illustrates how to format a USB flash drive using Windows inbuilt Command Prompt, and the following is the detailed guide you should strictly follow.

How to Format USB Flash Drive from Command Prompt

  • For your information, any form of disk formatting will completely erase data, so backup as many as important files before the start.
  • Altogether, you'll walk through the whole formatting process in eight steps, and the time spent will depend on the USB flash drive capacity and used space on it. (The following steps are performed on Windows 10 PC.)
Step 1: Type cmd in the search box, then you can get the best match called Command Prompt. Right-click on it and choose "Run as administrator".
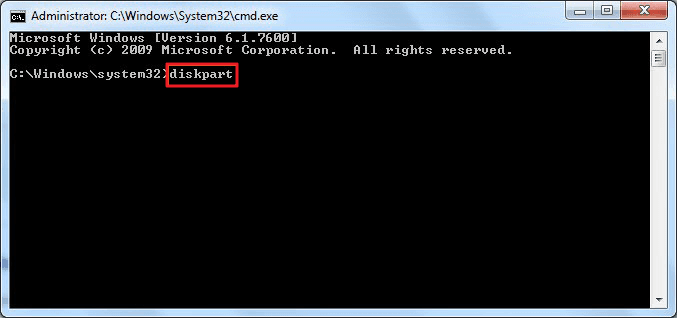
Step 2: On the Command Prompt window, type diskpart and press "Enter".
type diskpart to format usb flash drive using cmd
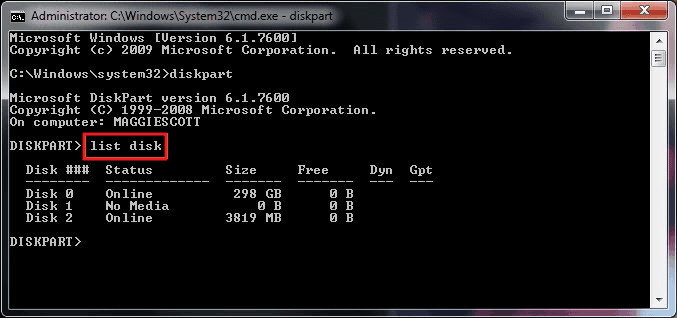
Step 3: Type list disk and press "Enter". According to the list disk information, check which disk is your USB flash drive. For example, disk 2.
type list disk to format usb flash drive using cmd
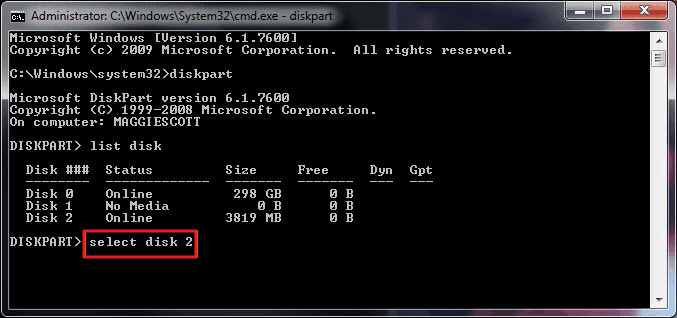
Step 4: Now type select disk 2 and press "Enter".
type select disk 2 to format usb flash drive using cmd
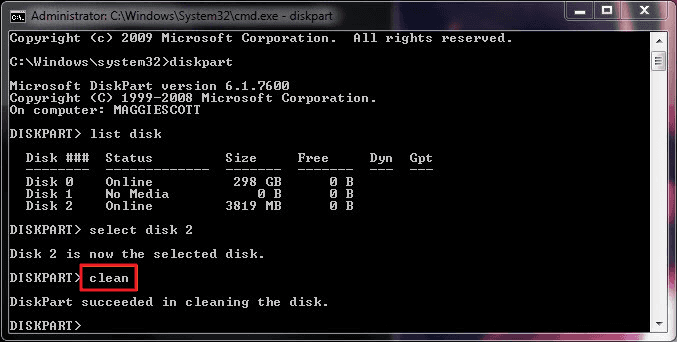
Step 5: Type clean. Wait some time for disk erasing.
type clean to format usb flash drive using cmd
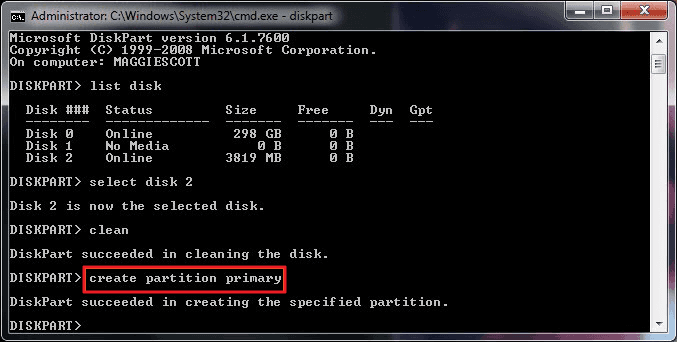
Step 6: Type create partition primary and press "Enter".
type create partition primary to format usb flash drive using cmd
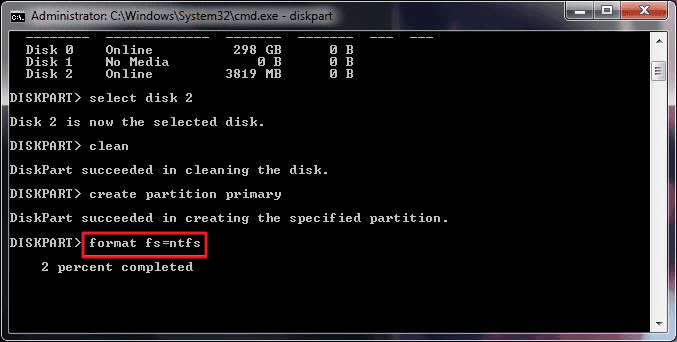
Step 7: After diskpart successfully created the specified partition, type format fs=ntfs and press "Enter". If you prefer other file system formats, change the command ntfs to the desired one such as fat32, exfat, etc.
type format fs=ntfs to format usb flash drive using cmd
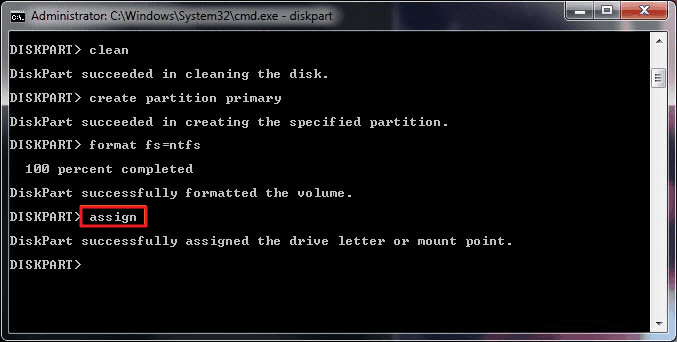
Step 8: Type assign to create a drive letter to the flash drive.
type assign to format usb flash drive using cmd


Dear reader, you wake up in the morning and you are already on the train for a freak presentation (neck), neck or pocket you set your flash with all the presentation you need to do that day, on the sidewalk you delay you arrive at the office in the meeting hall you find people waiting for you. You try to apologize and people understand you, the flashing flash on your computer is shocked by what you see, all the files are invisible. Then you start to get frustrated and start thinking about how to apologize for a second time as anxiety grips you about your worker's future.

Get rid of the doubt, you can recover your hidden files without a trace and continue your presentation. The important thing to know is why your files are hiding?

Causes of hiding files in your USB Flash drive:

Computer virus
Settings for your computer
Flash error


There are different ways to recover hidden files depending on the reason behind the hiding of those files

Method One: Here depends on the version of the operating system you are using, for Windows 8, 8.1 and 10 users open This Pc or My Computer, and in the top bar (Menu bar), select the view -> check the labeled Hidden Items and then hidden files or folders will appear.

Method Two: This is for those whose files or folders are hidden by a virus, here we move cmd to be able to recover our hidden files.

Open Command Prompt by clicking the Windows + X icon together, download up to Command Prompt to unlock. Or you can open the start menu for Windows 7 users, open the run and type cmd and press enter to open.

Here's to make your pendrive flash G: in windows explorer, then type the following or Copy and paste these commissions by right click on cmd and paste,

attrib -h -r -s / s / d g: \ *. *


Change the letter g: to the letters of your flash. Then press enter, and you will see that text line jump in the second line. Then all your hidden files will all appear even if they were hidden by a virus.

Method Three: Use your trusted Antivirus program like Kaspersky or Norton scan your Flash or you can download a tool that will help you get rid of Autorun virus here. http://ccm.net/download/download-11613-autorun-exterminator. Then install, this will help you remove all autorun.inf present on your computer as well as on your flash drive.

Note: Make sure you have a reliable Antivirus Program installed on your computer or update an existing antivirus to increase your security.


Imagine you are from home and away from a place or a street, there is one of your favorite songs or videos you see on your friend's computer and you really want to have them for the moment. When you ask your friend to give it to you, without hesitation letting you take it, you start to go into your pocket or bag to search for your USB Cable so you can transfer it and you discover the USB you left at home. You start to lose yourself because your favorite thing is missing because of cable.

Remove the doubt, this is where ES File Explorer comes in. Es File Explorer is an application that lets you copy all your files into your phone, your computer or in Cloud Storage.

ES File Explorer is the most important application to have in your phone if you are a smartphone user. Let's take a look at things that ES File Explorer can help you as a user of smartphones running Android operating system.

Transfer files from one device to another using a network (network)
View all your phone files using the same Application, like changing the file names.
It allows you to copy and paste multiple files at a time
It lets you search for any file in your phone without having to simply type the filename
It allows you to change the appearance of your folders, like sorting them in the best possible order.

It allows you to download your files (compress and reduce them) so that you can easily send them to email.
Watch videos or listen to music from your computer without streaming them to your phone
Protect your important files with a password.

How to transfer files from a computer using ES File Explorer
Download (download) ES File Explorer on your phone from the Google Play Store or you can use this link  ES File Explorer

-Install the Application in your phone

- Turn on WiFi Hotspot in your phone to gain access to the network that will connect your phone to your computer, do so by going to Settings–> More–> Tethering & portable hotspot–> Wi-Fi hotspot. Turn on then open the same field to set the name and password you will use in your Wi-Fi.


-Go to your computer and connect to the Wi-Fi transmitted by your phone by entering the same password you entered into the Wi-Fi hotspot.

-After your computer is connected to Wi-Fi, go to the folder or File you want to transfer, right click and go all the way to Properties, which is usually the lowest.

-After the properties open, go to sharing then click share, everyone so that it doesn't get in trouble later. When you finish, close the file.

- Then go to your phone and open ES File Explorer

-Click the menu icon on the top right of your application, then navigate to the network -> LAN

-After the LAN opens, click the circle-like symbol above to search for devices near you that use the same network. wait a moment, when it ends you will see the name of your computer or that of your friend in your application.


-Click that name to open it, it will bring you a computer username entry and password of the computer 'you will enter the computer's username and password.

- After that you will be able to see all the files you have allowed in sharing and you will be able to transfer them without any difficulty by clicking them.

Note: You can use Wi-Fi in the office, at home or at school to transfer files without using your phone's Wi-Fi Hotspot. But it is best to use Wi-Fi Hotspot to increase the security of your files and transfer speed. You don't have to have a data package to do this.

We'll bring you a special ES Explorer article to help you understand this application in future articles, so don't miss out on visiting this site to get more clever.


As salaam aleikum dear readers of this blog, after being lost due to today's bread-seeking issues I am back for your very close blog trying to fix your technological issues today to tackle the whole issue of facilitating download of torent files at a faster pace using IDM ie Internet Download Manager

Many people have been using torrent clients (like u-torrent, bittorrent, vuze etc) for downloading movies and apps with large files from various torrents sites but there is always the challenge of slowing down as you download a file with only a few seeders. To avoid this challenge today I know how to download files faster;

STEP 1:

1. First of all you have to have an internet download manager (IDM) if you don't have a download here completely FREE DOWNLOAD

STEP 2:

2. Link internet download manager and browser you use I usually use chrome you can download chrome browser here DOWNLOAD


STEP 3:

3.You need to open an account on a website called www.seedr.cc where you will receive a disk as much as 2gb (but it can be up to 5GB if you share it with your friends via your referral code)

STEP 4:

4. Once you open that account you will go to your favorite torrent site either rarbg.to, katcr.co, limetorrent.cc 13377x.to etc


STEP 5:

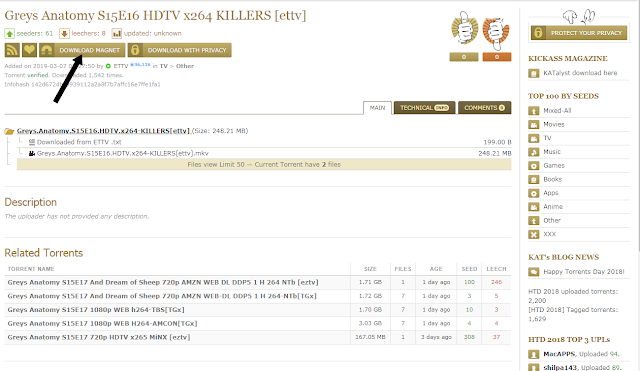
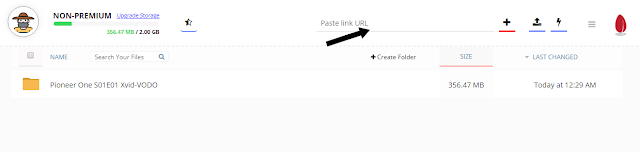
5. Copy the magnet link of the file as you see in the image above that you want to download and paste into seedr.cc


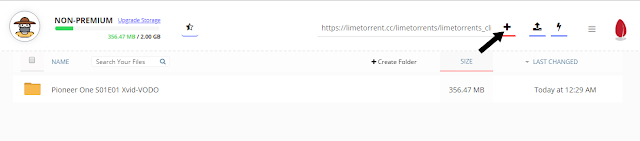
account has a section written in paste, then click the plus button


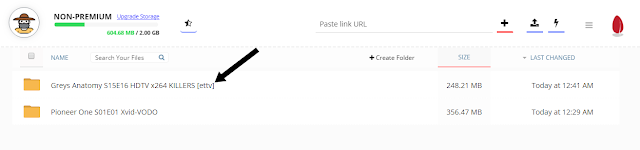
and your file will be created and you will see the download arrow you place your mouse in the created folder see image below


and you'll be able to download at a very good speed which is quite different if you were to use it

thank you for reading this article , please share with others....